A Blog

A Blog

Do Infrared Thermometers Detect Accurate Temperatures on Humans?

It has been said that desperate times call for drastic measures. However, when faced with a crisis, it is imperative to ensure that measures taken are appropriate and effective for the challenge at hand.


In an effort to help stem the spread of coronavirus, many people have been using non-contact infrared thermometers to determine human body temperature.  Often, the chosen instruments are industrial grade devices which are unreliable for human body temperature measurement.


Unlike infrared thermometers that are designed for medical use, industrial grade instruments can vary as much as 7.2 Fahrenheit (4 Celsius) degrees from a target's actual temperature.  In other words, using an industrial grade instrument on a person with a normal body temperature could yield temperature values ranging from 91.4°F (33°C) to 105.8°F (41°C).  Inaccuracy aside, the greatest risk in using industrial grade instruments is missing feverish persons who could infect others.


When using infrared thermometers on humans, one should only use medical grade instruments that have been certified for such use.  These instruments are far more accurate and will provide temperature values that are acceptably close to body core temperature.  For those electing to use infrared thermometers, we strongly encourage them to be trained in the proper use of their chosen equipment.


Thank you to all involved in treating the sick and helping to control the spread of COVID-19.  For those who are ill, we wish you a full and speedy recovery.

How to Clean Your Home After a Flood

By Haniya Rae

Last year, tens of millions of Americans experienced just how devastating floods can be. From January to October 2019, the estimated overall losses for damage caused by severe thunderstorms and flooding in the U.S. was more than $180 billion, according to the National Oceanic and Atmospheric Administration.

If your house has flooded, once your local police or fire department says you can return, you’re in a race against mold growth to clear out debris from your home. If you have flood insurance, the very first thing to do is file a claim—you have only 60 days to send in a proof of loss form documenting the contents of your home.....

Read more.

How to Avoid Drain Clogs and Sewer Backups

One extreme truth about drain clogs and sewer backups: They only happen on weekends and holidays when it is either expensive or impossible to get a plumber.

Here are three main ways to avoid sewer backups and clogged drains. They may seem simple, but people often don't take them seriously.

  1. Don't flush anything but toilet paper. Seriously, don't flush feminine products of any kind. Don't flush paper towels, facial napkins, and certainly not diapers.
  2. Don't dump a bunch of stuff down your garbage disposal at one time. This might become clear if, for example, you try to stuff all your potato peelings down the garbage disposal at once. After you do that, you can take the disposal trap apart and fish them out that way. This experience usually cements this rule in the mind of most cooks. Most find this out in preparation for a holiday dinner. Worse, if the large lump of stuff makes it through the trap, it is going to lodge in the sewer line. Very bad look for Thanksgiving.
  3. Don't pour grease down your drain. Some people actually think grease is the only thing you can put down the drain. And, that is wrong. All fats can be melted by running hot water down the drain with them, but the fats won't stay that way. They will ultimately harden and block the sewer line.

If you have slow drains or a block, solve the problem and call a plumber. Liquid drain openers can hurt pipes and that will cause many expensive future problems. At least a plumber can discover the cause of clogs and backups.


Your Monthly Maintenance Minute


Utility workers caution that ...Wipes in the pipes are clogging sewers

Sewers everywhere are stopped up and there is plenty of blame to go around from personal carelessness to faulty products.

For one thing, people think that any thin cleaning wipe or baby wipe can be flushed down the toilet. How wrong they are.

Non-flushable cleanup wipes, baby wipes, and sanitary products must not be flushed down the toilet.

The reason is simply that, unlike toilet paper, these other materials do not dissolve. Instead they clog up the sewers, damage equipment, and cost cities and taxpayers a lot of time and money.

In one city, they had to hire a contractor to vacuum out a lift station and remove a truckload of cloth material. It's happening all over the country.

The Association of the Nonwoven Fabrics Industry says researchers collected and analyzed materials from wastewater pumps and found that most items clogging equipment are not labeled flushable.

These items, experts suggest, should be more clearly labeled Do Not Flush.

Kimberly-Clark's flushable Cottonelle cloths undergo extensive testing to ensure they are compatible with home and city sewer systems. However, some flushables do not comply.

Some companies have heavily promoted bathroom wipes, while some cleaning product manufacturers have also advertised sponges they say can be disposed of in a toilet.

A Consumer Reports test showed that toilet paper disintegrated after about eight seconds, but some wipes still hadn't broken down after 30 minutes. They should never have been classified as flushable.

Infrared Inspections of Arc Fault Circuit Interrupters

Tip written by: Infraspection Institute

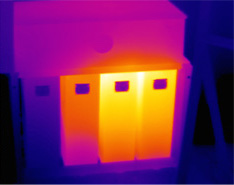
Excess heating is often a sure sign of defective electrical equipment; however, the absence of heat can also be a sign of component failure. In this Tip, we demonstrate how thermal imaging may be used to detect defective Arc Fault Circuit Interrupters. An Arc Fault Circuit Interrupter (AFCI) is an advanced type of electrical circuit breaker that automatically opens a circuit when it detects a dangerous electrical arc on the circuit it protects. Designed to help prevent electrical fires, an AFCI can sense between electrical arcs caused by defective equipment versus those associated with the normal operation of devices such as light switches. In order to monitor for dangerous electrical arcing on a circuit, AFCI devices have electronic circuitry built into them. This circuitry can cause the body of the AFCI to run several degrees warmer than ambient temperature. Depending upon the settings of your thermal imager, these devices may show a marked contrast to their surroundings. Thermogram shows three out of four AFCI devices operating at ambient temperature. These devices had failed and were no longer protecting against arc faults. Images courtesy Houston Thermal Inspections and Infrared Imaging. When thermographically inspecting AFCI devices, be sure to inspect the line and load side connections at the AFCI device as well as the neutral bus bar connection for the subject breaker. Should you find an AFCI device that is operating close to ambient temperature, it is likely that the internal circuitry has failed making the device incapable of protecting against arc faults. Such devices be further tested and replaced should they be found defective.  

Infrared Inspection of Capacitors

bayou

Capacitors are devices commonly found in AC electrical distribution systems where power factor correction is required. Like any electrical component, capacitors need to be regularly checked for proper operation. Infrared thermography can be used to rapidly inspect capacitors from a safe, remote distance. Capacitors are wound devices that are electrically connected between potential and ground. Capacitors used for power factor correction are generally encased in painted, rectangular steel canisters and often have two equal sized bushings for electrical connections. In a three phase circuit, there may be several capacitors connected to each phase. The most common failures of capacitors are loose/deteriorated bushing connections, open circuits due to internal winding failure, and open supply circuits. When inspecting capacitors, be sure to:

  • Visually inspect capacitor bodies. Capacitors should not be misshapen/swollen.
  • Thermographically inspect capacitor bodies. Capacitors should be warmer than ambient air temperature and exhibit equal temperatures across all phases.
  • Check bushing and wiring connections for hotspots.

Any thermal anomalies detected should be investigated and corrected as soon as possible. Capacitors operating at ambient temperature should be corrected immediately as imbalanced capacitance can be more detrimental than having no capacitors at all.

Source

Using an Auto Image Function

Sponsored by: infraspection logo

Auto Image is a feature found on many modern thermal imagers. While this feature may be helpful in certain imaging situations, its usage can cause thermographers to overlook significant thermal anomalies.

Humans have come to rely on technology to make our lives easier. We frequently take for granted how many mundane chores of the past have been automated. Each day we rely upon automatic transmissions in our cars, auto correction in word processors, and auto flush in lavatories. As infrared imaging has matured, automatic image adjustment has become a common feature on thermal imagers.

Auto Image, also known as auto adjust, is a feature commonly found on today’s thermal imagers. When engaged, the thermal imager will automatically adjust Level and Gain values so that the coldest and hottest objects within the imaged scene will be set as the lowest and highest temperature limits respectively. Auto Image may be for a single frame or it may allow for constant adjustments to automatically take place in real time.

While single-frame auto image may provide a good starting point for level and gain settings, full time usage of auto image will cause level and gain values to constantly change as the imager is panned across a given target. With values constantly changing, it is nearly impossible to make comparisons between imaged objects since there is no fixed, baseline value. In addition to making thermal imaging confusing, the use of fulltime auto image will cause many thermal anomalies to go undetected.

Thermographers who own thermal imaging equipment should familiarize themselves with their equipment to determine if their imager features automatic image mode(s). For imagers featuring single frame auto, a thermographer may use this feature to allow the imager to ‘suggest’ initial level and gain settings. For scenes that do not have a wide variation in temperature such as building envelopes or roofs, auto image may provide optimal imagery. If not, the thermographer should then manually adjust the imager’s level and gain settings in order to optimize the displayed image.

For thermal imagers that do not have onboard level and gain controls or for those that feature full-time auto image, the technique for optimizing the displayed image is as follows:

  • Set imager to Auto Image mode
  • Aim and focus imager on item of interest
  • Pan imager slightly to obtain optimal contrast within scene
  • Immediately switch to Manual mode to lock range/level settings
  • If possible, adjust range and level controls to further optimize displayed image

ith the above steps completed, the thermographer may continue imaging similar objects under similar conditions. Should scene conditions change, the above steps may be repeated as necessary. Properly adjusting level and gain is an extremely important part of thermal imaging. For best results, a thermographer should never rely on full time auto image to provide optimal imagery.

Source

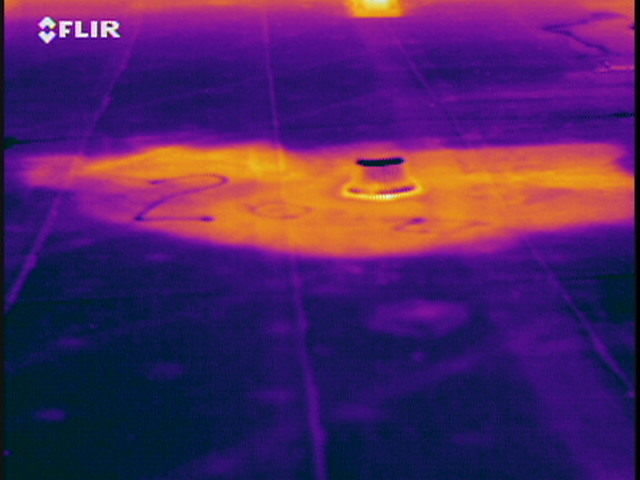
Spring is the Time for IR Inspections of Roofs

With thBayoue onset of warmer weather, the harshness of winter is but a fading memory for most. Left undetected, the damage caused by winter’s fury is a reality that can lead to premature roof failure. Fortunately, an infrared inspection of your roof can detect evidence of problems before they get out of hand.  

Performed under the proper conditions with the right equipment, an infrared inspection can detect evidence of latent moisture within the roofing system often before leaks become evident in the building.  

The best candidates for infrared inspection are flat or low slope roofs where the insulation is located between the roof deck and the membrane, and the insulation is in direct contact with the underside of the membrane. Applicable constructions are roofs with either smooth or gravel-surfaced, built-up or single-ply membranes. If gravel is present, it should be less than ½” in diameter and less than 1″ thick.  

For smooth-surfaced roofs, a short wave (2-5.6 µ) imager will provide more accurate results especially if the roof is painted with a reflective coating. All infrared data should be verified by a qualified roofing professional via core sampling or invasive moisture meter readings.

Source

Using an Isotherm to Detect Potential Condensation Sites

Tip written by: Infraspection Institute

Condensation on interior building surfaces can lead to a variety of problems including conditions conducive to mold growth. Used properly, the isotherm feature found on many infrared imagers can be utilized to spot potential condensation sites.

Simply put, dew point is the temperature at which water vapor in the air will cause condensation to form on a surface. When interior building components are cooled to dew point temperature or lower, water vapor will precipitate out of the air causing water to form on the subject component.

Luxury house with a two-car garage and beautiful landscaping on a sunny day. Home exterior.

For building envelopes, chronic condensation on interior drywall surfaces can cause unsightly staining by trapping dust or smoke particulates in these areas. Chronic condensation on organic building components is also conducive to mold growth. Condensation often goes unnoticed until building occupants notice stains associated with the aforementioned conditions. Fortunately, a thermal imager can be used to detect condensation problems before they become serious.

To utilize a thermal imager to detect potential condensation sites, identify the dew point temperature for the room or areas that you are inspecting. Set your imager’s isotherm function to appear at, and for several degrees below, the dew point temperature. As you inspect high emittance building surfaces from the interior of the building, note any components that cause the isotherm to appear. These areas should then be further investigated for cause and appropriate action taken.

When using an isotherm, be sure to practice proper measurement techniques giving particular consideration to viewing angle, spot measurement size and emissivity settings.


What's the unit of measure for water vapor through a barrier?

Perms (and what a sweet one that is!)

While the hairdo may not be as influential as it used to be, vapor barriers - justifiably - are getting more and more attention.

Why?

Controlling humidity is arguably the most important - and potentially controllable - aspect of Building Science.  Air conditioning itself was created when Carrier devised a way to lower the humidity in his library.  The cooler air resulting started a revolution. (Thank God!)  Aside from comfort, the damage from not controlling humidity in your home can be disastrous.

Maybe you've never heard the term vapor barrier, but you've certainly seen new builds with "Tyvek" printed all over the outside - or maybe the inside. . .  It all depends on where you live.  In more humid climates you'll see the vapor barrier on the outside.  While dryer climates have them on the inside trying to keep the warmth and moisture in.

Vapor Barriers ALWAYS keep the Moisture, or humidity, always flows from areas with more humidity to those with less.  If you keep it out, the air in your home can be uncomfortable dry.  If you trap it in - you might create a breeding ground for molds and mildew.  Ever leave water in an ice chest for too long?  On a home's scale, these effects can have health and construction consequences.

I.E.  The rate at which water vapor flows through a barrier (like Tyvek) is measured in Perms!


No-Clog Clothes Dryer Duct Booster® Conforms to the New DEDPV Safety Standard

dryer booster

Improves Drying Times, Prevents Lint Build-up, Dust and Fire Hazard Potential.

The level of safety and performance of residential clothes dryers has been raised thanks to the Model LB2 Dryer Duct Booster® available from Tjernlund Products, Inc. This unique booster fan offers a 5-year No-Clog guarantee, the potential of reducing clothes drying time up to 60 percent to save energy, while incorporating features allowing it to be Listed to the updated DEDPV, Dryer Exhaust Duct Power Ventilator supplement to UL#705. The latest IRC restricts use of dryer booster fans to those tested to the DEDPV supplement. The TjernlundModel LB2 is Listed for use on both gas and electric clothes dryers.

Adding dryer booster fans in clothes dryer ducts has increased substantially with the placement of laundry rooms not adjacent to outside walls. Duct runs often exceed the maximum duct length that the dryer is rated for - typically 25 feet and two elbows. TheModel LB2 Dryer Duct Booster® is rated for duct lengths up to 150 feet! It can reduce drying times and energy consumption up to 60 percent.

The Model LB2 Dryer Duct Booster® fan attaches easily to four-inch rigid duct and plugs into an electrical outlet. A display panel mounted near the dryer confirms system status and operation. It communicates via a factory-connected low voltage cable to an on-duct boosterboard booster fan control. The control monitors pressure and temperature within the duct to operate the booster fan in sync with the dryer and to stop booster fan operation if duct temperature exceeds 165˚F or signal if the duct becomes blocked. A rotating mounting bracket allows the Model LB2 to be installed vertically or horizontally. Rubber vibration mounts isolate the fan ensuring quiet operation.

  Beyond the DEDPV compliant control system, the heart of the Model LB2’s effectiveness is its exclusive No-Clog lint handling blower design to eliminate regular cleaning of lint from the housing and blower wheel. This feature assures consistent booster fan performance with minimum maintenance. The Model LB2 Dryer Duct Booster® is available through industrial, HVAC distributors and online. For additional information contact us today!


Source